
- Eastwood TIG 200 Review: All You Need to Know! - June 25, 2022
- Best Drywall Sanders – How to Find Them and Which to Buy - June 25, 2022
- Makita vs Dewalt Drill – Which is the Best Brand? - June 24, 2022
Having the right saw for a project can change your woodworking game completely. That said, you don’t need every saw or tool for your home improvement efforts. Even advanced woodworkers keep a handful of versatile tools that help them complete their projects smoothly and cost-effectively. Making the right choice means knowing what each saw is capable of and what purposes they serve.
If you’re a complete beginner, the selection of tools can be an overwhelming process. Therefore, keep things simple for yourself, and let’s look at tools on a one-on-one basis to decipher whether they are the right fit for you—starting with Radial Arm Saws vs Miter Saws.
If you are on a limited budget, a great miter saw for the money is the Dewalt DW715. This highly impressive tool is not only the most economical on this list but it's also one of the best miter saws on the market.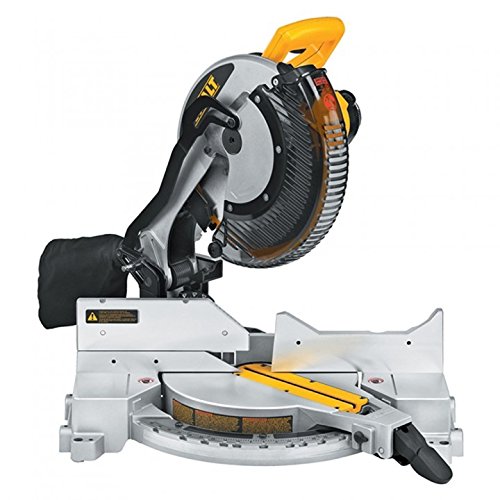
The Main Differences Between Radial Arm Saws vs Miter Saws
The Main Differences Between Radial Arm Saws vs Miter Saws are:
- Radial Arm Saws have a higher cutting depth allowing it to cut through thicker lumber, whereas Miter Saws are not made for cutting thicker wood.
- Radial Arm Saws cannot be shifted around and needs a station for operating, whereas Miter Saws are portable and you can lob it around where ever you want.
- Radial Arm Saws can achieve a variety of cuts, whereas Miter Saws typically offer 4 cuts.
Regardless of your level, you’re most likely familiar with miter saws given their popularity; while the alternative has faded from mainstream use. They’re essentially both mounted circular blades but vary within their form, function, and use.
On a surface level, the radial arm saw would seem to provide more functionality. That said, before running off to order one, there are a few more considerations that need to be looked at when it comes to each saw.

Miter Saws
The miter saw is essentially a stationary power tool that uses a circular blade for quick and accurate crosscuts.
Unlike most other circular saws, it allows for greater precision and control through its hinged arm, an attached workpiece with a slit, and a fence. Its blade is usually 8-12 inches in diameter, allowing for those precision cuts.
In order to make the tool safe to use, there’s typically a blade guard and dust collection mechanism in place. Likewise, the rotation for making miters are also built with a scale that allows the user to cut at any degree.
There are three main variations available:
- Compound Miter – This allows the blade to pivot from left to right; thereby, allowing the user to manipulate the saw in either direction.
- Dual Compound Miter – Much like a compound miter saw the dual version allows you to tilt both to the left and right for quick bevels at any angle.
- Sliding Compound Miter – This variation allows the user to slide the blade forward and backward in addition to compound movements. Therefore, you’d be able to cater to wood pieces of increased lengths.
What Can Miter Saws Be Used For?
Given its design, the saw can be used for making four types of cuts:
Crosscuts
This is the standard cut which slices across the grain direction of any wood piece. Its perhaps the most common cut you’d make within any of your projects.
While almost all saws can make a crosscut, the miter saw definitely makes it much easier, quicker, and precise. No need to whip out a scale or clamps; simply place the wood against the fence and slowly bring the saw head down. You can make a cut according to any width, as long as it is catered to by the blade.
Miters
An angled cut across the width of the wood is typically known as a miter cut and is used for essentially creating a corner. It’s typically used for making boxes or frames; therefore, making it a pretty essential slice.
The miter saw is naturally great for making such cuts given the saw can pivot to various degrees and provide stability through its hinged handle and fence.
Bevels
Similar to miters, bevels are also angled, but it goes through the thickness of the wood. Its typically used to join two pieces of molding for an invisible seam.
The cut is typically made by tilting the blade of a miter saw at your selected angle, instead of the workstation and the wood is placed as normal. The angular blade will create an automatic bevel. Check out the differences between Miter vs Bevel cuts in our full comparison here.
Compound Cut
If you’re making kitchen renovations and require crown wood moldings to be seamlessly cut, compound cuts are perfect for those. The cut is a mix of a miter with a bevel cut.
Making a compound cut is fairly simple, as well. You’ll need to adjust your miter and bevel angles to your desired degrees before cutting into your wood.
Features of A Miter Saw
- A power cutting tool with a motorized system.
- Available in various blade sizes ranging from 8 to 12 inches in diameter.
- Rotation angles can be locked into place for precise cuts and quick adjustments. Likewise, it also consists of depth stops to adjust the height of the blade.
- The clear protective blade guard helps to provide safety from accidents while also functioning as a collector of wood shavings and saw bits to keep your workspace dust-free.
- Clamps or table extensions may be available.
- Side fence helps to add stability for taller stock while laser guides may be added for additional accuracy.
Pros of Miter Saws
- Makes Four Variations of Cuts – Being able to cut at an angle using the workstation or blade allows the user to customize cuts in a measured way.
- Is Precise – Use to its blade diameter and motorized system – the saw is able to cut through any piece of wood with relative ease. Additionally, the rotation features help to streamline between different cuts.
- Variations Available for Further Customization – For users looking for additional versatility or quicker operations, there are a number of variations available.
- Safety tools – The in-built safety guard and dust collector add its design safety measures allowing you to saw with peace of mind.
Cons of Miter Saws
- Not as powerful – While it caters to most projects, the miter saw is relatively not made for thicker wood cutting.
- Less Variety of Cuts – As compared to the radial arm saw, you’re somewhat limited by the type of cuts you can make. However, buying a variation, such as the sliding compound miter saw can improve on its versatility.
If you are on a limited budget, a great miter saw for the money is the Dewalt DW715. This highly impressive tool is not only the most economical on this list but it's also one of the best miter saws on the market.
Radial Arm Saw
The radial arm saw has become less popular throughout the years, yet it remains as one of the most versatile tools. In fact, if you’re short on space, this one tool can help replace the need for many others.
Much like the miter saw, it consists of a circular blade mounted unto a sliding arm which can power through the wood stock to make a variety of cuts. The blade itself can be adjusted to various angles and degrees; however, these will have to be measured and adjusted by the user. The blade diameter ranges from 12 to 22 inches giving it to cut through thicker lumber.
Where the radial arm falls short is within a safety mechanism. Power saws generally pose risks of injury with their ability to cut off fingers, if not used with caution. Furthermore, if you’re dealing with a dull blade, it can grab your wood piece and kick it around the room. That said, the saw does have locks, and a fence can be built on the side to provide stability and safety.
Radial Arm Saw, Power Source Corded, Blade Dia. 10 in, 12 in, Max. Blade Speed 3,400 RPM, Current 6.5 A, Horsepower 2, Arbor Size 5/8 in, 1 in, Arbor Shape Round, Bevel Angle Range 45 Degrees , Bevel Stops 3, Max. Cut Depth @ 0 Deg. Bevel 3 in, Max. Cut Depth @ 45 Deg. Bevel 2 1/4 in.
What Can Radial Arm Saws Be Used For?
Given its design, the saw can be used for making four types of cuts:
Crosscuts
Making crosscuts is fairly simple with a radial arm saw. Using a scale, measure out the wood piece you want to cut and mark the top with a pencil or marker. Remember to account for the blade width.
Lower and align the blade to the piece before powering on the saw. Hold the stock against its fence (add in extra fencing, if required) and pull the saw towards you in the width of the wood once the piece has been cut, power off the blade and return it to a neutral position before any interaction.
Miters, Bevels and Compound Cuts
When it comes miters and its variations, the saw comes with miter and bevel release levels which allow you to get the degree you wish to cut in manually.
You’ll want to ensure that the blade is lifted while you make any adjustments and lock the angle in place before you proceed. The depth of a cut is also manually set depending on your own adjustments. However, unlike the miter saw, setting the degrees will require more measurements as there is no actual indication on the saw itself.
Dadoes and Rabbets
Given its ability to set its depth according to your requirements, you can use the radial arm saw for making dadoes and rabbets.
Rabbets is an L-shape cut along the edge of a board whereas dadoes are U-shape cuts across its width. The cuts may come in handy as joinery within projects.
Ripping
Lastly, you can also use your saw for ripping, which helps to cut pieces in length, instead of against its width. This is done by rotating the blade to the saw and locking it in place. The pawl should be released and adjusted to the height of the board to prevent any jams from kicking back. If you do consider cutting this way, however, take extra caution as this is when the blade is most hazardous to the user.

Features of A Radial Arm Saw
- Consists of a power circular saw with a mechanical arm.
- Blade diameters range from 12-22 inches with additional attachment such as the dadoes blades available.
- Its side fence is typically sufficient to provide stability and accuracy for various cutting options; however, you can attach an additional fence if required.
- Can be rotated and place in a variety of angles and depths to provide versatility in its cuts and their usage.
- Safety guards can be purchased to make cutting for security for the user.
Pros of Radial Arm Saws
- Powerful Cutting Depth – Due to its blade diameter, the saw can cut through tough lumber while also catering to everyday woodworking use.
- Versatility – The rotations and changes in degree provide the user with maneuverability, unlike other saws that are restricted in their use.
- Occupies Less Space Than A Table Saw– Given its size and usage, the radial arm saw can help decrease clutter by removing the need of any tools or other saws and is fairly compact than some other options.
Cons of Radial Arm Saws
- Not as Precise – Unlike the miter saw, you won’t be able to achieve the same effortless precision; therefore, the radial arm saw is generally not considered beginner-friendly.
- Requires more safety precautions – While guards and safety tools can be purchased, the mobility of the tools ultimately make it more prone to cause injuries than their counterparts.
Radial Arm Saw, Power Source Corded, Blade Dia. 10 in, 12 in, Max. Blade Speed 3,400 RPM, Current 6.5 A, Horsepower 2, Arbor Size 5/8 in, 1 in, Arbor Shape Round, Bevel Angle Range 45 Degrees , Bevel Stops 3, Max. Cut Depth @ 0 Deg. Bevel 3 in, Max. Cut Depth @ 45 Deg. Bevel 2 1/4 in.
Frequently Asked Questions
Here are a few of the most commonly asked questions about radial arm saws and miter saws:
While you get substantial maneuverability with the radial arm, it can take away from precision. Therefore, it’s advised to measure out your requirements beforehand, make markings, and use appropriate fencing to get that clear cut.
While no drastic variations are present, you can add further versatility by the thickness or type of blade you use.
If the proper measures aren’t taken, then yes, Unlike more modern woodworking tools, there are few guards available. That said, separate safety guards and tools can be purchased to make it secure for your woodchopping needs.
If you’re looking to add precision with ease of measurement, then purchasing a miter saw would be a good option. It provides more hand precision than most other circular saws.
When it comes to selecting a blade diameter, consider your project requirements and size of wood you need. The more inches it is, the wider and deeper your cuts will be. As a general rule of thumb, if your workpiece is 2 x 6 inches, opt for a blade above 12-inch, else you can go lower.
Frequent maintenance is the key to keeping your cuts smooth and fresh; however, if you’re looking to add more precision, consider purchasing a blade with higher tooth counts.
The saw’s in-built safety measures generally work well; however, it is important to note that you should not cut any timber with loose knots or foreign objects in it. These may detach and become a hazard.

Radial Arm Saw vs Miter Saw: What to Look Out For
When choosing between the two, you’ll need to consider a few factors which will ultimately help you make the decision.
Power
As important as the saw form and function is, the driving power is an important factor that determines cutting capacity. It is advisable to purchase a saw with high power capacity so it can help you get through multiple blocks of wood for your ease.
Blades
Depending on whether you’re buying new or second-hand, you might want to upgrade your blades depending on your woodworking project. The size, shape, and number of teeth can all vary your end result so you might want to research blades while you’re at it.
Safety features
Some saws come with their safety measures inbuilt; others need external bits to make them more secure. Different brands will provide different features, therefore keep an eye out for it. You always want to go for equipment that keeps you away from injury or harm.
Precision
The miter saw, for example, offers higher precision due to its blade diameter than the radial arm saw. Some saws have laser/LED guides, clear blade guards and safety lock mechanics which can add to precision. But all that depends on your project and your preferences in the end.
Brand
Lastly, when it comes to picking a brand, ask around. The company name and model should be reputable to ensure the claims are accurate. You can buy second-hand; however, physically check the saw before purchasing. This all helps to ensure your woodworking experience is positive and you’re spending your cash on a saw that lasts.

Saw Safety Tips
Lastly, given our recommendations of the two, it’s important to keep safety in mind at all times. When dealing with power tools, there are specific precautions which need to be taken.
- Research beforehand – When you’ve made the decision about purchasing a saw, look at the reviews and instructional videos beforehand. It’ll prepare you from an experienced woodworker’s use of the saw and show you what you can achieve with it.
- Read the instructions that come with your saw – The instructional manual outlines all the precautions required for assembly, before, during, and after usage. Taking the time to go through the recommended methods is an important part of keeping yourself safe as you handle the machine.
- Don’t forget about maintenance – Saws are expensive tools and can last a long time if you maintain them properly. Each component from the blade to its workstation should be maintained according to its requirements.
- Wear protective equipment – No matter how easy or quick a cut seems, always put on gloves, headgear, and protective glasses. Be wary of your body as you navigate the cut and wear clothing that cannot get snagged on the blades. You might also consider using a push-stick to ensure your hands are away from any danger.
- Don’t mix and match blades – While you can buy additional blades, only use those who have been tested to work with your specific machine. Aside from being money wasted, it can create kick-backs that can be a safety concern.
- Always allow the blade to stop completely – Allow the blade to stop turning before you interact with any objects on the workstation. Preferably, also powering off the machine. Also, ensure your hands are still away from the blade at all times.
- Remember to have an after-care procedure – No woodworking project is complete until the dust has been cleared up, blades stored away and the workstation is wiped down. Refer to the instruction manual, if required.
Radial Arm Saw vs Miter Saw: Which One Should You Get?
It depends on your project; however, we recommend the miter saw.
For most home improvement projects, the miter saw will ultimately suffice to provide you with all the wood cutting you’ll need. From creating cupboards for your bathroom renovations to adding additional frames within your bedroom, you’ll be able to handle all of it.
A radial arm saw is a powerful tool that provides more variety, but beginners should opt for a miter saw which provides them a base for learning and has versatility in individual usage. Because of the learning and safety concerns, radial arm saws ultimately become an inferior choice.
If your project calls for a power tool that calls on the ability to cut thick or multiple boards while advanced shaping flexibility, only then would the radial arm saw be a good option. That said, if you go through this route, take some classes and always use it with utmost caution.
If you can afford to spend a little time chopping your wood and don’t need specific cuts, the miter saw is an invaluable tool. Its cuts are quick and precise, which makes it a more efficient choice. The safety adds to your renovations also helps with its appeal. Additionally, the tool does come with its dust-collection system, which makes clean-up easier as well.
Keeping all the above mentioned in mind, we’d recommend the miter saw the tool to purchase to start off your woodworking journey.
If you are on a limited budget, a great miter saw for the money is the Dewalt DW715. This highly impressive tool is not only the most economical on this list but it's also one of the best miter saws on the market.
Recommended Safety Gear
Designed for industrial or construction settings, this first aid kit will help you deal with workplace injuries that require some "patching-up". Contains a full assortment of items for a variety of issues. Also a great addition to your garage or shop or home for life's little emergencies. A must-have for your protection when woodworking. These gloves are made out of breathable nylon shell and have nitrile dipped and dotted palm & fingers. Featuring high-end materials and finishes, 3M Sports-Inspired Safety Eye-wear is the go-to choice when you need premium protection and sleek design. The most important thing to remember about Plugfones is that they're earplugs first and earbuds second. As such, the entire Plugfones line is tested and compliant with ANSI S3.19-1974 noise reduction standards and meets NIOSH criteria.


Do you still need help finding the right tools for you? These articles might interest you:

