
A-Z Guide: Best Woodworking Tools
Woodworking is a hobby – which can ultimately turn out to be a fulfilling profession – if you like to work with your hands and don’t mind getting dirty with sawdust and a mill. If you have a passion for building beautiful sculptures or pieces of furniture with wood or can fix any part of your home that requires a little tweak, you should consider taking up woodworking as a profession.
It is all about learning the woodworking craft, practice until you become a fine woodworking craftsman and you will be able to build furniture and repair anything in your home.
It takes time to become proficient at woodworking; however, as you make your way towards that expert status, no experience is a waste. You will be able to repair almost anything in your home and will rarely need to call a maintenance specialist to fix anything for you.
If you decide to improve your home, you can do so quickly and without any stress or spending too much money.

To be adept at woodworking, you need tools and equipment. These come in two forms: hand tools and power tools. The tools in each of these categories are crucial to your success as a woodworker, and although you don’t have to purchase every one of the tools at once – or brand new – you need to ensure you have as many of them as you can buy in your arsenal.
In this write-up, you will learn a lot about woodworking, and if you are planning to embark on a home improvement campaign, you will know the tools that you need to get hold of first before any other.
Without wasting too much of your precious time, let’s dive in.
Must-Have Home Improvement Tools
No matter how well-made or sturdy your house is, a time will come when one part of the house or the other will require restoration, maintenance, and repair services. As a great homeowner, you should be adequately prepared for such eventualities.
Having the right equipment and tools on hand is vital to the successful repair or maintenance procedure of any home. Every household should have at least a basic collection of equipment and hand tools for fixing up small home repair problems.

There are essentially two types of home improvement woodworking tools: the hand tools and the power – or electrical – tools. In this section, we will be going over a combination of hand tools and power tools which are essential when it comes to home improvement.
Part of the collection of home improvement hand tools should include:
- Adjustable wrenches
- A claw hammer
- Saw
- Drills
- Measuring tape
- A set of pliers
- Fastener tools
- Tools for plumbing and electrical repairs
- Sockets, etc.
Let’s a look at some of the must-have home improvement tools today:
Hammers
This is the most popular hand tool, and the most favorite is the curved-claw nail hammer version. They come with steel heads along with steel or wood handles and are generally used for driving nails or other fasteners.
The head of the steel hammer has two faces; one edge is a two-pronged steel arch which is usually utilized for pulling nails out of wood while the other end is said to be the face and the eye.
A plane-face or flat-face hammer is an excellent choice for beginners, but driving a nail home is somewhat tricky with this hammer.
If you’d be hammering on surfaces that could be severely damaged, the rubber mallet is the tool to reach for. Other varieties of hammers include:
- The ball-peen hammer that is ideal for working with metal
- The mason’s hammer used during brick and concrete projects
Measuring tools
Nearly all home-improvement project requires accurate measurement since you need to be sure that everything will – at the end – come out level, square, and plumb. Let’s get into more details about some of the measuring tools required for marking and measurement:
Tape measure – Flexible tape measures come in different lengths; some are from 12 to 25 feet while others are up to 50 feet. A tape that is not less than 5/8 inches wide is a good one to own as it will remain rigid when you extend it.
Most tape measures are equipped with an automatic power return which is very useful, especially after you are done with measurement.

Chalk line –A chalk line is used for marking a straight line but over long distances. It is ideally used when replacing flooring tiles or wallpaper.
Square – A carpenter’s square dimensions are about 18 to 24 inches (i.e., body) by 12 or 8 inches (i.e., tongue). This standard size is vital for cutting straight edges on hardboard and plywood.
Another much smaller variety is the combination square which is allegedly more straightforward to use than the standard version. There is another version known as the “try square” which closely resembles the carpenter’s square, but comes with a plastic and wooden handle.
Handsaws
After measurements, it’s time to start cutting. There are a wide variety of handsaws that you can utilize, according to your preference and for various jobs. Let’s take a look:
Crosscut saw – As its name implies, this tool is used for cutting across the grain of wood. It has at least five to ten teeth or even more per inch so that a smooth cut is produced. Crosscut saws are used for cutting hardboard panels and plywood as well as for cutting miters.
Backsaw – The back of this tool is reinforced to stiffen the blade and comes with closely-spaced teeth so that the cut remains smooth. The backsaw is generally used for trimming molding and making angle cuts.
Coping saw – This tool has a thin blade which is secured with two pins at either end of the saw. It can be fitted with multiple blades with crosscut or ripsaw tooth spacing. Read our full guide on how to find the best Coping Saws.
Hacksaw – Hacksaws are used for cutting plastic, metal, and pipe.
Other types of handsaws include:
- Ripsaw
- Keyhole saw

Power saws
At times, handsaws may not be sufficient, and this is when you need to turn to power saws. Power saws are intimidating and must not be used unless you have received adequate training on how to use it. This is because it can cause a lot of damage within a short time.
The universal power saws that you can utilize are:
Saber saw – Also referred to as a jigsaw, it comes with a 4-inch blade which can be driven in an up-and-down motion. It is portable and uses multiple blade designs for a wide variety of materials. Saber saw is the power version of the coping and keyhole saw
Circular saw – Another portable power tool, it is the power version of the ripsaw or crosscut saw, and its guide can be adjusted to cut pockets and miners in nearly all building materials. It uses multiple blades and is usually mounted as a table saw.
Other woodworking tools required for home improvement include:
- Screwdriver set
- Utility knife
- Duct tape
- Wrench set
- Pliers set
- Adjustable wrench
- Multi-Bit Screwdriver
- 18V DIY Power drill
- Electrical extension cord
- Wire stripper
- C-clamp
They also include:
- Caulking gun
- Zip ties
- Outlet tester
- Electrical tape
- Wood screws of varying sizes
- Fish tape
- Volt/Ohmmeter
- Toolbox
- Socket set
- Drawer tool chest
How to Buy Used Woodworking Equipment and Tools
If you are just starting as a woodworker or even if you have been doing it for some time, you will discover that acquiring a variety of woodworking tools that you need to make your work easy for you will set you back a pile of cash. Incurring such major expenses may put your bank account in the red and leave you with almost nothing to fall back on, yet you need these woodworking tools to facilitate your work. You may have to consider purchasing used equipment and tools.
Anyone who spends money to purchase any product or service needs to get the best value for his/her money. You can reduce the expenses by purchasing used woodworking tools, but only if you follow some common sense rules.

The first of these common-sense rules is knowing which used woodworking tool you should purchase, which ones should be brand-new, and who to buy from. Understand this, and you will be surprised at the considerable sum of money you will end up saving and still have in your budget to focus on the home improvement project.
Where to Find Used Woodworking Equipment and Tools
There are several places where you will be able to find used woodworking equipment and tools to add to your workshop at reasonable prices. A few excellent sources include:
- CraigsList
- Flea markets
- Woodworking forums online
- Auctions in your area or locality
Auctions are usually publicized in the local newspapers, and if you love buying and reading papers, you may come across a few happening in your area.
If you also take your time to carry out more research, you may unearth a lot more authentic sources where one can purchase used woodworking tools and equipment cheaply.

You should bear in mind that jumping at the first thing you see as regards woodworking equipment is not a wise move. Once you come across any seemingly authentic source where woodworking tools are sold, you need to, first of all, determine whether or not you are getting good value for your money or merely flushing your hard-earned money down the drain. You will discover that many of the things out there are not worth purchasing in any way.
Another essential factor you should take into consideration even as you shop for used woodworking equipment is the availability of spare or replacement parts of a piece of equipment. You do not want to want to purchase a piece of woodworking equipment only to find it extremely difficult to find spare parts for it whenever you need them.
The third thing you should take into consideration as you shop for your equipment and tools is the purpose that these pieces of equipment are meant to serve. As a hobbyist or a professional woodworker moving towards starting a Home Improvement business, you need to be exceptionally careful.
Investing in a piece of woodworking equipment or tool that is not working in full swing and contributing massively to the bottom line will be a grave mistake. That is an undisputable way of running out of business.
If you are in any of the categories highlighted earlier, one of the best things to do that will be of immense help to your profession and goal of becoming a master at woodworking, is to develop a relationship or make friends with a business that sells used pieces of equipment and tools professionally.
Doing this will ultimately make you happy with your purchases or investment. The reseller will also get to understand your specific needs per time and go extra miles for you.
How Old is The Woodworking Equipment or Tool?

Naturally, you may start wondering how old a piece of woodworking equipment is without being considered useless. Of course, many woodworking equipment and tools can be reconditioned.
However, for motorized equipment, you need to check the age of the motor in addition to the availability of spare parts. If, for instance, you are interested in purchasing a 15-year old piece of woodworking equipment, and the machine in question still has the original motor, then it is highly likely that you will be paying for a lot of future problems. If you have already struck a relationship with the reseller, they will be able to provide highly valuable information about such occurrences.
Lastly, make sure the woodworking tools you want to purchase are constructed with sturdy materials of high quality. This is because high-quality equipment is safe to use and will usually last a lifetime if maintained properly.
Identifying a quality woodworking tool is relatively easy, and that is by taking a look at its machining. The metal sections are shiny – even after a few years of use – and relatively smooth. The tool fits comfortably in your palm and is well-balanced.
But inferior tools are made with rough metal – thereby showcasing crude machining – and are replete with defects which are mostly hidden by paint. Good woodworking tools are also sturdier than cheap ones that are prone to breakage and causing accidents.
So don’t sell yourself short by focusing only on the cost of the woodworking pieces of equipment and tools. The original purpose of purchasing used pieces of equipment and tools is to obtain quality at a reduced and reasonable price.
Woodworking Rules Every Woodworker Must Know and Follow
Woodworking can be an agreeable and safe vocation or hobby as long as you adhere to a set of fundamental safety rules. These rules are easy to follow and must not be taken for granted at any time because failure to comply may result in severe injury when working with your woodworking tools.
The woodworking workshop is not a place where you can be careless or be hasty but should be a place to learn and implement good safety habits which will make the vocation more enjoyable.
Most – if not all – the safety rules are common-sense ideas and should be easy to remember and imbibe. However, before delving into woodworking safety rules, it is highly crucial for you to be extremely aware of the potential dangers that are associated with woodworking or woodworking tools.

Wood is one of the most utilized as well as the most versatile mediums in the entire world, thanks to its abundance in nature and inherent flexibility. The woodworking craft has developed several techniques over the years to produce a range of products such as sculptures, furniture, etc. You should also give high priority to the hazards involved in this activity.
Working with hardwoods such as rosewood, for instance, can be a threat to health since excessive exposure to its dust can trigger nasal allergic and skin reactions in woodworkers. The hardwood dust can also make woodworkers highly susceptible to a particular type of cancer.
The exterior of hardwood that has just been cut discharges a sap that if it comes in direct contact with human skin, can trigger allergic reactions. Prolonged exposure to hardwood dust – e.g., redwood, cork, and oak – can also cause several respiratory diseases such as:
- Asthma
- Lung scarring caused by recurrent respiratory attacks
- Hypertensive pneumonia
Continuous exposure to hardwood dust has been linked to a particular type of sinus/nasal cancer known as Aden carcinoma. The latent period of this specific type of disease is between 40 and 45 years. In-depth studies have revealed that at least 7 out of every 10,000 woodworkers are more than likely to develop this ailment.
Some preservatives and pesticides can also pose a risk to overall health in woodworking. It is now practically impossible to ascertain the specific chemical that is reportedly dangerous in processed wood.
This is one of the primary reasons why both Canada and the United States have taken combined and active steps to ban the importation of wood that has already been treated with a toxic white chemical compound known as pentachlorophenol which is used as a preservative.
Any wood that has also been treated with chromated copper arsenate and creosote are also unwelcome in these nations.

What many woodworkers are not aware of is that pentachlorophenol can infiltrate the human skin and can bring about a severe case of acne, known as chloracne. The toxic chemical compound has also been fingered as a probable human carcinogen and can even cause acute liver damage.
Chromated copper arsenate can also be extremely toxic primarily via ingestion, physical contact, and inhalation. It can trigger different skin diseases as well such as skin ulcers, skin cancer, and allergies. It can also severely compromise internal organ functions such as kidney damage, peripheral nervous system damage as well as blood damage.
Creosote is the culprit responsible for causing respiratory system and skin irritations. The thick yellowish-to-brown oily substance has also been categorized as a feasible teratogen – i.e., an agent that affects fetus or embryo by altering or interrupting healthy development – and human carcinogen.
Now that you know the potential dangers that lurk in woodworking, let’s get into details about the safety rules that every woodworker must know and follow for a happy woodworking life:
Utilize Proper Safety Gear
One of the first rules in woodworking is wearing appropriate safety gear. You should never enter your workshop or workplace without wearing all the necessary equipment that enhances your safety.
Hearing equipment is highly required because of some woodworking tools that are extremely noisy – like routers, surface planers, etc. – which transmit high-pitched sounds that can cause permanent loss of hearing in no time at all. Sawing lumber to different pieces is also a deafening procedure; therefore, make sure you wear earplugs or ear muffs at all times, especially within the period when you will be working in the woodworking workshop.
Don’t expose your eyesight to unnecessary risks. Always make sure that you wear goggles or protective eye gear to shield your eyes from flying debris when making use of hand tools. You should also wear protective eye gears when applying wood finish since the chemicals may exert a drying effect on human eyes.
You should always make use of a face shield whenever you want to use a chainsaw or work with a lathe. But do not rely on a face shield alone; wear a pair of safety goggles underneath the shield.

You should take note at this juncture that prescription – and non-prescription – lenses like readers and eyeglasses do not count as safety glasses unless they are explicitly designed to meet particular criteria.
You should also not enter your woodworking workshop without donning a pair of thick gloves to protect your hands from accidentally touching saps of lumber or preservatives. Latex gloves are ideal for applying wood finishes, so make sure they are within reach at all times.
Protect your airways by installing chip collectors, air filters, and dust collectors in your woodworking workshop. Of course, the indispensable dust mask must also be part of your safety inventory. Keep the woodworking area orderly and well-ventilated since you never know when particles of dust may enter the respiratory tract and cause untold harm.
You should wear appropriate footwear with customized arch support so that your feet will be protected from the strain of standing for hours. Moreover, leather boots can protect your feet from cuts which may occur when you accidentally drop sharp chisels. Steel-toe shoes will protect your shoes from being crushed if you inadvertently drop a hammer or a sheet of plywood slips without warning from your hands.
Your protective or safety gear should be the first thing you reach for as soon as you step into the woodworking workshop.
Always Wear the Right Attire
It is also crucial for you to wear the proper attire that will go with other safety gear for adequate protection in the woodworking workshop. As a rule, you should avoid wearing clothes that are loose-fitting or baggy clothing as they tend to get entangled or snagged in a saw blade or cutting head.
You should instead wear clothes that are not too tight-fitting but comfortable for you and the type of work you will be doing for the day in the woodworking workshop. Short sleeves are ideal for working in woodworking workshops as long sleeves can easily get entangled on a workpiece that is spinning relentlessly on a lathe. If you wear long sleeves, endeavor to roll them up before commencing in the workshop.
Your clothes should also be thick enough to protect your body from wayward wood chips as a result of cutting lumber. Divest yourself of all bracelets, necklaces, wristwatches, and any other pieces of jewelry any of these items can get caught quickly and may pull your hand into bits, blades or pulleys.

Wear Your Respiratory Gear
Respiratory protection range from washable cloth masks, half facepiece respirators disposable masks, to air respirators powered by electricity.
Let’s examine these respiratory gadgets:
Washable face masks – Washable face masks can be used repeatedly and hand-washed as well. They can be exceptionally comfortable to use and perfect for handling moderate or small amounts of dust.
Disposable masks – Disposable masks are cheap, which may be why they do not provide adequate protection as much as the other types of respiratory protection apparatus.
They do not fit as tightly as required. Therefore, fine dust particles can easily bypass the filter and into the lungs.
Half facepiece respirators – Half facepiece respirators provide high levels of respiratory protection. Most of them come with replaceable filters and cartridges that readily absorbs vapors. They are also perfect for capturing particulates like dust particles.
Half-facepiece respirators are comfortable and adjustable devices that can fit your head comfortably. Most of these devices – along with their cartridges – are approved by NIOSH, the federal government regulatory agency that is responsible for protection against a wide variety of contaminants.
Power Air respirators – These have battery-powered fans that provide an uninterrupted stream of filtered air to a full facepiece mask. They are relatively more expensive than any of the other respiratory devices mentioned earlier, but are also more comfortable, thanks to the continuous inflow of air.
However, the masks that come with these units are also loose-fitting as they are not as tight around the face compared to the half-facepiece respirators. This is because this respirator relies on the positive air pressure inside the masks rather than a tight seal to keep the dust and other harmful substances out.

Be Careful When Dealing with Power
It is imperative to deal with power the right way whenever you are working on your home improvement project or any other project for that matter. If you need to switch bits or blades on your power tools, make sure you disconnect the power cord from the mains before you do so.
The same rule applies if you need to make a few adjustments to any electrical woodworking tool. Don’t stop at checking whether or not the switch is off because there have been several cases of switches malfunctioning at the wrong time, thereby causing a lot of mishaps to woodworkers such as the loss of their fingers.
Therefore, make it a habit to always disengage the power first before carrying out any adjustments required.
You should also make sure that all electrical woodworking tools are doubly insulated and well-grounded to prevent fire accidents or electrical injuries.
Avoid Using Drugs or Medication and Alcohol While Working
Sounds absurd, right? But you will be surprised by the number of cases that involved seasoned or pro woodworkers who entered their workspaces drunk like skunks to work on a woodworking project. Those who suffered the mishaps thought that they are not vulnerable to making mistakes even though they were under the influence of drugs or alcohol. They lived to tell tales but were never able to go back to work again.
Whatever reason you may have, you should never venture near your workshop if you are drunk or pumped full of drugs. Some medication may also cause drowsiness, and if this is the case, you should also stay away from operating any equipment or tool in your workshop.

This is because drugs and alcohol are powerful enough to influence your decision-making process and can even slow down your reaction. So, whether you are a pro or a beginner, you are still vulnerable to accidents and can always make woodworking mistakes, especially if you are under the influence.
Keep Tools and Equipment Properly Adjusted and Maintained
Equipment and tools that are not correctly aligned and maintained present safety hazards such as the ejection of loose cutter heads, kickback, etc. You need to make sure that table saw fences are properly aligned parallel to the blade so that workpieces will not be trapped between the blade and fence.
Common Mistakes When Using Woodworking Tools
Everyone was a beginner at doing something at one time or the other and during such periods, making mistakes is a relatively regular occurrence. Even pros who know how to use woodworking tools with their eyes closed still make mistakes from time to time.
It’s all part of the learning process and should be considered as experience. Of course, you are not expected to repeat the same mistakes over and over again but to learn from it and move on or improve on it. Woodworking is a rewarding and enjoyable activity, especially when you make use of the proper equipment and do everything the right way.
Here are some of the common mistakes woodworkers make when it comes to using woodworking tools:
Using the Wrong Tools
The first thing you should always do is to ensure that you make use of the right set of woodworking tools for the job. Let’s say you are working on a piece of furniture and have decided to remove a few scratches here and there so that the furniture turns out looking good.
You will need to use an electric sander so that you can get the job done within a few minutes. Sanding it by hand is going to take several days which you may not have the luxury of sacrificing. You will need to make use of 100 grit sandpaper on the majority of woods to start with or 80 for dull sander parts.
Then you work your way slowly but surely through fine grades of sandpaper. Remember that you will be blowing off particles each time you change the sandpaper. You will need a vacuum cleaner for blowing particles off the piece of furniture you are working on. A vacuum cleaner is an excellent alternative to opt for if you do not own a compressor.
Working Manually Instead of a Tool
If you need to sand a shape or a curve, using sandpaper will be a waste of precious time. It is better, therefore, to use a tool to help you achieve results fast. For an edge, use a block plane or a file and for curves, a pattern maker’s rasp will do the job. Never rely entirely on sandpaper; you should only use sandpaper to smooth the surface of the furniture.
Not Using Safety Goggles and Dust Masks
The tagline, “Safety first!” holds here. Whenever you are sanding, do not forget to make use of your dust mask and safety goggles. This is because some of these exotic woods can be allergenic or even poisonous, so a dust mask will help in preventing unwanted health issues.
Safety goggles are designed to protect the eyes; therefore since you will be working with wood, it makes a lot of sense to put on a pair of goggles so that splinters don’t fly off and make their way into your eyes.
Sanding may not require woodworking power tools, but it still calls for care and overall safety.

Wearing Dangly or Loose Jewelry When Wood Working
You should never wear loose jewelry to the workshop, and even if you do, make sure you divest yourself of them before you start working on wood. This is because it can be hazardous for you to wear ornaments on your body when working in your workshop.
Applying Undue Pressure on the Drill
This is another fairly common mistake that most people make when using woodworking tools. Whenever you are making use of a power drill on wood, do not mount pressure on the drill because the wood may splinter and this could destroy all the work you have been doing.
Ideally, the weight of the drill will do the work of driving itself into the wood that you are working on. If you are making use of wooden screws, then employ the countersink bit on your drill, and then mark the depth of the hole you want to drill on your bit. This will help you to gauge the depth of the hole accurately.
Seal the hole with a wooden plug or filler that matches the wood you are using correctly. Drilling requires a lot of patience, and if you find yourself somewhat restless, put it off until another time.
Before you start the drilling process, mark the exact spot you want the nail or screw to be with a good pencil and make the initial hole with an awl. Secure the wood with wood clamps so that it does not fly off the workbench or workable and hit you or other people around you. You should also drill slowly to avoid breaking and overheating the woodworking tools.
To wrap up this section, you need to realize that most of the mistakes that occur when using woodworking tools can be avoided if you take your time to plan what you are going to do carefully while you make sure to follow all safety precautions. Woodworking is a great thing to know whether you are making a few home renovations or want to become a master woodworker. This skill is also a trade that can earn you a satisfying career. Happy woodworking!
Woodworking Tool Recommendations
Claw Hammer
The most commonly purchased claw hammer is the 20 oz. size. It’s heavy enough to easily drive nails but easily manipulated when pulling nails. While wooden handles are picturesque, they may not stand up to the strain if you have to pull a lot of nails.
Hammers with a steel handle, or even fiberglass, will be stronger. However, these won’t absorb the vibrations from driving nails the way a hickory handle will. You’ll also need to make sure the fiberglass and metal handles have a rubberized grip for control and comfort. If you’re going to be driving a lot of nails, the wooden handled hammer will be better for reducing stress on your hand, and wrist, too.
Utility knife
A good utility knife is another asset for the woodworker. There are many different kinds, but the kind that uses disposable blades is the most common. The blade retracts into the grip for safety. The woodworker will use the utility knife when cleaning out mortise joints or scribe wood, as well as many other uses.
How to Find the Best Welders: Guide to Welder Types and Applications
The first thing that you have to understand when looking at welders is that there is not just one type of welder that is available for all of the different applications. The best thing to do is to look at the process, understand the different types of welders and what jobs they are good for, and to choose the welder that you need based on the advantages and capabilities that match your needs. By doing this, you will be ensured that you are getting the welder that you want.
Of course, if you are an experienced welder then you might want to skip over a few of the categories. There is still a lot of good information for you. There is still a lot that you can learn. The biggest thing to remember is that you have to be able to match your needs, welding skill level, and the welder that you will have the most success with. There are several different featured Welders in this article.
We really loved the ones from the manufacturer Miller and were happy to include their top models in each category. If you are looking for any type of welder, our biggest suggestion is to check out Miller for the type of welder that you are looking for and the exact specifications that you need. You will not be disappointed with a product that comes from this company that has a long-standing dedication to value and quality.

What are the 4 Different Types of Welders?
There are four different types of welders. These include the Shielded Metal Arc Welder (SMAW and/or Stick Welder), Gas Metal Arc Welder (GMAW and/or MIG Welder), Flux-Cored Arc Welder (FCAW), and Gas Tungsten Arc Gas Welder (GTAW and/or TIG Welder). Each of these has its own uses and things that they are used for. They are each better for different types of welding and different welding styles.
A Quick Look at the Welding Process
There are four different welding processes. These include SMAW and/or Stick (Shielded Metal Arc Welding), GMAW and/or MIG (Gas Metal Arc Welding), FCAW (Flux Cored Arc Welding), and GTAW and/or TIG (Gas Tungsten Arc Gas Welding). Each one is a process that has limitations but also has benefits for different jobs. Being able to know what you need is a very important process.
SMAW and/or Stick Welding
If you are a welder who learned to weld using an arc welder, then you learn stick welding. This was the most common type of welding to teach in the past. It is the most popular type of welding for home welders. There is an electric current that flows from the gap that is between the metal and welding stick, which is known as the arc-welding electrode.
This type of welding is great for creating joints and with alloys, which means that it is perfect for both indoor and outdoor welding. You cannot use this method with metals that are thinner than 18-gauge. You have to frequently charge the rod and there is quite a bit of clean-up that is needed afterward. This is a harder type of welding to learn. You can purchase arc welders that are AC, DC, or AC/DC powered; the most efficient of which is AC.
GMAW and/or MIG Welding
Shielded Metal Arc Welding uses a MIG welder which has a wire welding electrode that is on a spool and is fed through at a constant speed that is pre-selected. When it is used there is an art that is created by the electrical current that travels between the base metal and the wire, it works to melt the wire and join it with the base.
This produces a high-strength weld that is going to look great and does not require as much cleaning as some of the other methods. MIG Welding is one of the easiest forms of welding as well and you can use it with thin or thick plate metals. It is a simple type of welding that you can easily learn and it is going to allow for you to easily create a clean weld on materials as thin as 26 gauge that is made from steel, stainless, and/or aluminum.
FCAW and/or Flux-Cored Welding
Flux Cored Arc Welding is another process of welding that is similar to the wire-feed process, but different. One of the biggest differences is that the flux-cored welding does not require that you use a shielding gas. What happens is that the flux-covered wire is actually used and able to keep the arc from becoming contaminated.
This welding approach is one of the easiest and most efficient. This is really the best choice if you are going to be doing welding outdoors when it is windy or if the materials are dirty. It is the main type of welding that is used in construction. It is an easy type of welding to learn and it will help you to create a very clean weld on aluminum, stainless, and steel. You can weld something as thin as 26-gauge.
GTAW and/or TIG Welding
Gas Tungsten Arc Welding is a type of welding that uses a non-consumable tungsten electrode that produces the welds. There is a shielding gas, typically argon is used, that protects the weld area from contamination from the atmosphere. There is also a filler metal that sometimes protects some welds. However, there some welds called autogenous welds, that are not required to use this.
One of the things that makes TIG welding unique is that it uses a constant-current power supply that produces energy that moves across the arc through a column of ionized gas and metal vapors, called plasma. It is the type of welding that you use when welding thin sections of stainless steel, alloy steel, and nonferrous metals (aluminum, copper alloys, and magnesium).
You have a lot of control with this type of welding which produces the highest quality welds. It is a more difficult type of welding to learn and one that is much slower than other types of welding.

A Quick Breakdown of the Welding Process
-
SMAW and/or Stick Welding
- Can be used in windy/outdoor conditions.
- Can be used with dirty or rusty metals.
- Used on thicker materials.
-
GMAW and/or MIG Welding
- The easiest type of welding to learn.
- Very high welding speeds are possible.
- Better control of metals that are thinner.
- No slag to clean with cleaner welds.
- Uses the same equipment as FCAW.
-
FCAW and/or Flux-Cored Welding
- Works well on dirty/rusty materials.
- Welding out of position.
- Able to use deep penetration for welding thick materials.
- The metal deposition rate is increased.
- More forgiving with dirty/rusty materials.
-
GTAW and/or TIG Welding
- Very precise and high-quality welds.
- Weld beads are highly aesthetic.
- Foot control allows adjustable heat input while welding.
The Best Welders
Finding the best welders can be tough. You have to know what to look for and how to find it. Once you understand the welding process, you will be able to figure out what your needs are for purchasing a welder. Here are some of our favorites from each category. One note to make is that the Miller brand seems to be the best option when purchasing welders for the home.
GMAW and FCAW Top Picks
Millermatic 211

The Millermatic 211 helps to weld materials that are up to 3/8 in thickness and 24 gauge in a single pass. It offers an MVP (multi-voltage plug) which can help to provide versatility so that you can use 120 volt or 240-volt input power.
Where to purchase? You can purchase the MIllermatic 211 from Amazon here.
What should you expect? The MIllermatic 211 offers advanced auto-set with special running gear and a cylinder rack that offers multi-voltage options. It is a 230 amp portable welder that runs with both 120 volts and 240 volts output. Thanks to the inverter design the welder requires less power but still maintains a superior arc.
It weighs just 38 pounds and is capable of welding metal that is up to 3/8 inch thick. It also has an advanced auto-set that allows you to have the voltage that you need without having to worry about how you will use it.
The inverter design of the Millermatic 211 means it draws less power, has a superior welding arc and weighs up to 40% less than other MIG welders in its class. It features Advanced Auto-Set, which eliminates the guesswork of setting voltage and wire feed speed for your MIG welding application.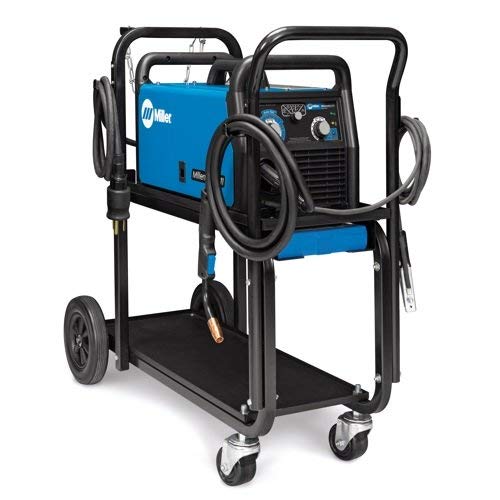
Millermatic 141

The Millermatic 141 is a great choice for someone looking for a welder that is easy to use and operate. It features an all-in-one 120-volt capacity. It can weld 24 gauge to 3/16 inch thickness. It works best with mild steel and allows you to be able to get the results in one pass.
Where to purchase? You can purchase the Millermatic 141 online here.
What should you expect? The Millermatic 141 operates on a 120-volt input. It has an all-aluminum housing and features all-aluminum housing. It is the perfect option for contractors and farmers who are trying to make sure that they have something for speedy repairs. The auto-set option allows for control with automatic settings to help you weld properly each time.
The unit also features a wire drive with a quick-select drive roll that works with the angled all aluminum drive system. There is a quick-select drive roll that allows for two different sizes of wire to be used as well as the third flux-cored wire. There are many different features that make for simple welding.
This Welder uses a breakthrough control that automatically sets your welder to the proper parameters. Auto-Set offers all-in-one MIG minus the hassle of finding parameters. Simply set the wire diameter, the material thickness, and start welding.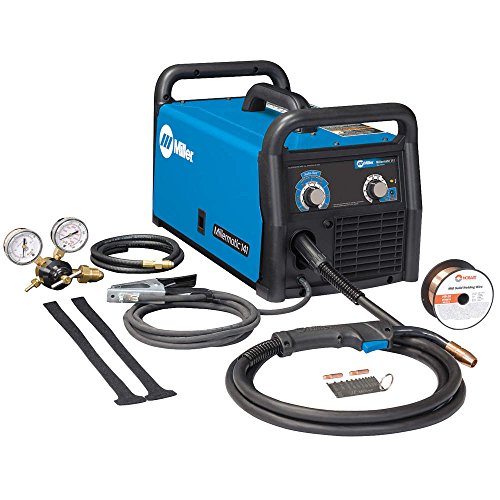
Millermatic 212

The Millermatic 212 is an all-in-one welder that allows for you to weld materials that range from 22 gauge to 3/8 inch thickness. This can all be done in a single pass. Plus, there are many features like the auto-set which allows for quick and easy setup.
Where to purchase? The Millermatic 212 can be purchased online, here.
What should you expect? The Millermatic 212 is a high voltage welder that uses a 208 and/or 230 input voltage. It has fifteen-foot leads and factory-installed running gear which work with the auto-set feature to help you set weld parameters for easy welding. There is an infinite voltage control that eliminates or replaces the tap settings so that you can feed the wire in the manual mode if you would like to have more control.
The Millermatic 212 is compatible with the 200 spool gun and the 200 wire speed control on the gun will save time for you when you are operating. In addition, it will reduce needed maintenance and operating costs.
This Welder Machine measuring 30" X 19" X 40" has 208/230 input voltage spool mate 200 spool gun and dual cylinder rack has Auto-Set™ feature that automatically sets your weld parameters while the manual mode allows the user to set the parameters for broader applications.
GTAW Top Picks
Miller Diversion 180

The Diversion 180 is a perfect personal use welder. This machine uses AC/DC power and operates at both the 120-volt and 240-volt inputs for power.
Where to purchase? You can purchase the Miller Diversion 180 online, here.
What should you expect? The Miller Diversion 180 is the perfect choice for being able to create projects at home. It is the perfect welder for home repairs, garage or shop jobs, auto body repair, chassis/frame fabrication, aluminum oil pans, stainless exhaust, metal art, vocational training, and sheet metal work. There is really nothing that you cannot do with this welder. It also features a compact and durable design.
This Welder is a perfect welding machine for personal use. It's AC/DC TIG upgraded machine has both 120V and 240V input power capability. It’s as easy as “1, 2, 3” to set your machine and start welding! 1. Power-up, 2. Select material type and 3. Set material thickness range. They've also added a digital display so you know exactly what your settings are.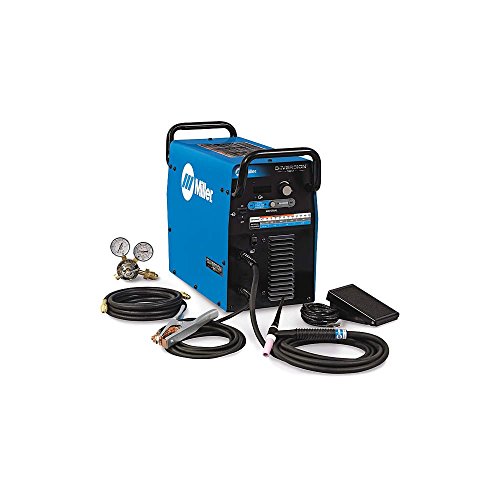
Miller Syncrowave 210

The Syncrowave 210 is perfect for light-industrial applications as well as personal use. This welder operates as a TIG welder with AC/DC power input and operates as a stick welder with DC input. This allows for the right performance and allows for you to be able to afford an inverter.
Where to purchase? The Miller Syncrowave 210 can be purchased here, online.
What should you expect? The Miller Syncrowave 210 has all of the features that you are looking for as well as a special front-panel memory card data port so that you can update the software and add additional features to the machine.
There is a Pro-Set feature that allows the speed to be controlled with pre-set controls. In addition, you can use the voltage plug to use a common 120-volt or 230-volt power receptacle without having to change anything. Plus there is an AC balance control that allows for easier cleaning.
In addition to all of this, you will find that there is a pulse control that enhances the welding bead and helps to improve appearances and quality with a puddle control. You can burn through materials without warping effects that you might experience with other welders as well.
The easy-to-use Syncrowave 210 provides legacy arc performance that allows you to expand your capabilities with an all-in-one package. While other multiprocess units lack the ability to TIG weld aluminum, your Syncrowave 210 has AC TIG. Also through the spool gun accessory you can MIG weld to fill those gaps or increase your travel speed. 5 Amp TIG Capability Allows users to weld thinner materials than other machines in this category.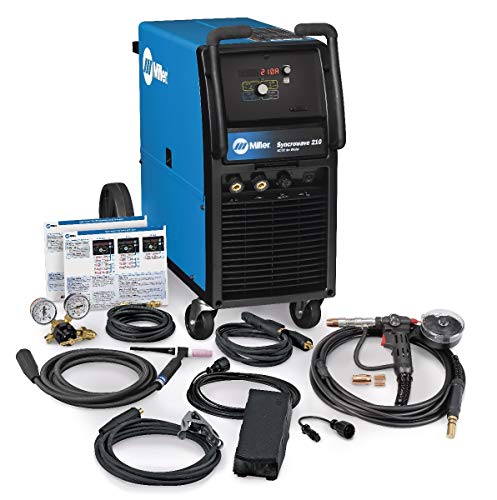
Dynasty 210

Dynasty 210 has the most flexibility and offers advanced inverter technology. In addition, there is an Auto-Line feature that allows you to be able to get the most from this welder. It features an AC/DC power source and can be used for both TIG and stick welding.
Where to purchase? The Miller Dynasty 210 is available online, here.
What should you expect? With the Miller Dynasty 210, you should expect a professional welder. This welder is really intended for those who are going to use it a lot and specifically for those who use a welder daily for their jobs. It uses an advanced 210 amp AC/DC output. It is capable of both AC and DC welding. There are extensive controls and features that make this one of the top welders on the market today.
There are actually four different advanced TIG arc waveforms that you can use this welder to create. You are able to update and expand the welder to do more with the memory card adapter. There is a Pro-Set feature so you can use professional settings easily. There is also a sleep timer that automatically powers off the machine if you are not using it for so long. You never have to worry about walking away from a project and having your welder still be on when you return.
In addition, there are many features like the Auto-Line, Lift-Arc, Wind Tunnel Technology, Line Voltage Compensation (LVC), Squarewave Technology, and Thermal Overload Protection which are just a few of the things that make this a great welder to purchase.
Tig welders are most commonly used to weld thin sections of stainless steel, aluminum, magnesium, and copper. Here is some additional information about Miller Electric TIG Welder. Application: Precision Fabrication, Heavy Fabrication, Pipe and Tube Fabrication, Aerospace, Aluminum Ship Repair, Anodized Aluminum Fabrication, Input Voltage: 120 to 480VAC, Series: Dynasty 210.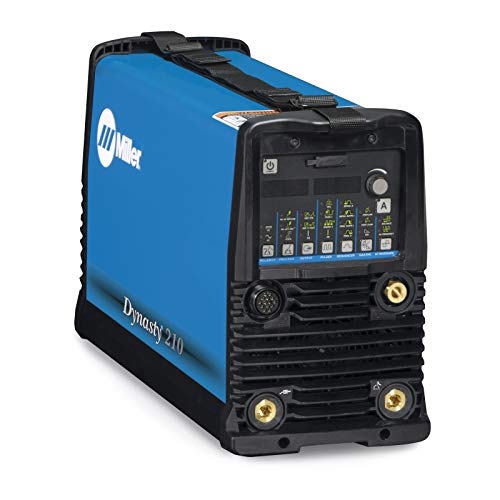
SMAW Top Picks
Thunderbolt 160

The Thunderbolt 160 is one of the best welders in the SMAW class. It is known for being portable, being a powerful stick welder, and even includes both 120-volt and 240-volt input power capabilities thanks to the MVP (multi-voltage plug).
Where to purchase? The Thunderbolt 160 by Miller is available for you online, here.
What should you expect? The Thunderbolt 160 is a powerful and sophisticated stick welder. It is portable and you can use it easily. One of the things that makes this welder so convenient to use is that it weighs about one hundred pounds less than most welders in this class.
It is versatile and offers both 120-volt and 240-volt options. You get everything that you need to start welding as well. There is even a shoulder strap on this one because it is so easily carried around.
Also known as shielded metal arc welding (AKA SMAW welding), a stick welder is typically lighter and more portable than MIG welders and TIG welders, and requires no gas. Here are some important details for Miller Electric Stick Welder. Input Voltage: 120/240V, Application: Garages, Job Shops, Farms, Ranches, Maintenance and Repair, Light Fabrication, Shipbuilding, Duty Cycle: 30%.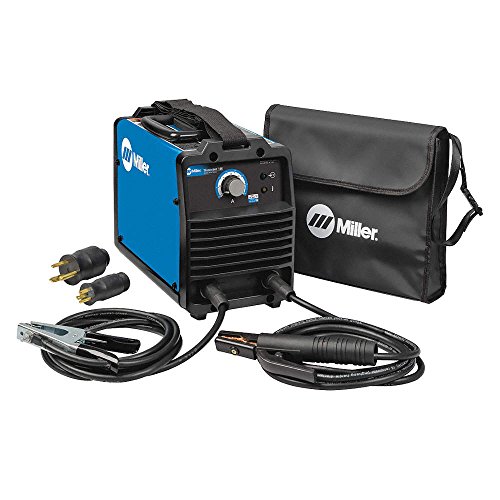
Thunderbolt 210

The Thunderbolt 210 offers welds up to 210 amps and has more power. It is a lightweight and portable unit that allows you to use it in a variety of light industrial applications.
Where to purchase? The easiest way to purchase the Thunderbolt 210 is online, here.
What should you expect? There are a few different things that you can expect when you are using the Thunderbolt 210. One is that you are not going to have to lug the unit around. It actually only weighs about fifteen pounds, but it is still capable of welding up to 3/16 inch steel. It can carry a 20% cycle with the 210 amp output.
One of the best features that Miller put into this unit is the specialized hot start technology that allows for easy and quick starts. It is a welder that will not disappoint and one that you can rely on for years to come.
Weighing in at only 15 lb., the lightweight Miller Thunderbolt Stick Welder is nearly 100 lb. less than previous versions, to provide outstanding portability. It features Hot Start technology for quick, reliable starting, and includes electrode cable, electrode holder, work cable with clamp, and power cord.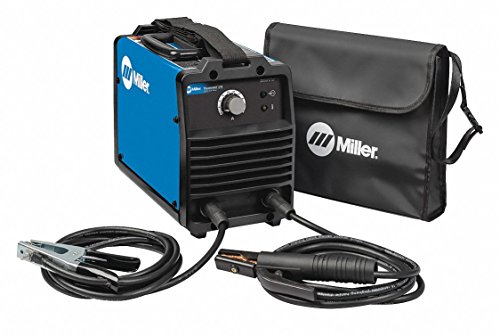
Top Multi-purpose Welder Pick
Multimatic 215

The Multimatic 215 is one of the best multi-purpose welders available today. This machine has a special feature that allows for MIG, TIG, and stick welding. This versatility and the fact that it is easy to use makes it one of the top choices. It is an all-in-one welder that allows you to connect to a 120-volt or 240-volt input power and will weld up to 8-inch mild steel.
Where to purchase? The Miller Multimatic 215 is affordable and available here.
What you should expect? The Miller Multimatic 215 features a 230 amp output. It is the perfect welder for all four of the welding types and can handle all types of jobs with ease. Surprisingly, this unit is very affordable and cheaper than many of the other welders featured. It weighs in under forty pounds and features the ability to cut metals between 24 gauge and ? of an inch. This means that you can literally do all of the jobs that you want with just one unit.
It is a great purchase if you are not sure what type of welding you will be doing or what you will want to do with your welder. It has many of the same features as the other units with a special Auto-Set Elite that allows for the easiest automatic settings and features.
Easy-to-use and versatile MIG, Stick and TIG welder that helps build skills. Color screen featuring Auto-Set Elite. This all-in-one welder connects to 120 or 240 volt input power. Welds up to 3/8” mild steel.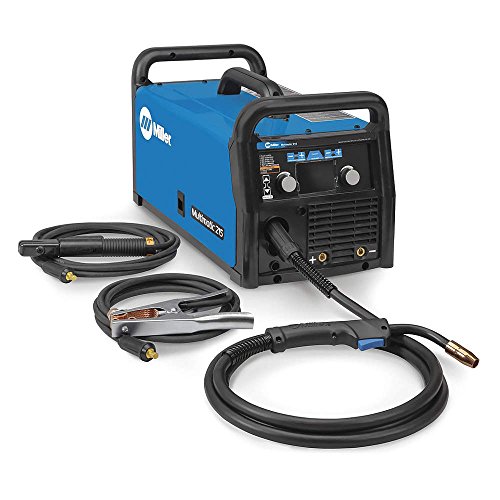
How to Pick a Welder for the Job
There are many different types of welders for the job and depending on the types of projects that you are going to be doing and the materials that you will be welding, there is certain to be a model or type of welder that is better suited to meet your needs. There are so many things that you can use your new welder for from creating metal sculptures to restoring old cars, fabricating a motorcycle to repairing farm and home equipment. Regardless of what you want, there is sure to be a welder for the job.
Some facts that you should know center around metal thickness. Depending on the welder that you purchase, you will be able to use it on different sizes of metal. Some welders work better for thinner metals, while others are meant for the thicker metals. Finding the right welder for your needs can be simple and easy.
Average Metal Thickness for Possible Projects
- Auto bodywork — 3/16 inch or less
- Fencing — ¼ inch to 5/16 inch
- Trailer Frames — ¼ inch to 5/16 inch
- Farm Work — 5/16 inch to ? inch
- Ranch Work — 5/16 inch to ? inch
- Landscape Work — 5/16 inch to ? inch
- Structural Components (those that are thicker) — Over ? inch
- Tube Frames — 1/16 inch
- Bicycles — 1/16 inch
- Lawnmowers — 1/16 inch
- Boats — 1/16 inch to ? inch
- Motorcycles — 1/16 inch to ? inch
- Cars — 1/16 inch to ? inch
- Hunting Stands — 1/16 inch to ? inch
- Utility Trailers — 1/16 inch to ? inch
- General Repair to Heavy Repair — 3/16 inch to ¼ inch
Of course, the first thing that you will want to do before you start purchasing a welder is to identify the type of projects that you are going to be working on. This will include knowing the specific thickness of metals that are associated with these jobs as well as knowing what type of metal these welders are made out of.
There is some additional information that you should consider and check out. One of these is that you will want to know the type of welding for each type of metal. This is going to help you to come up with the right type of welder for the metal that you will be cutting and/or putting together. It will help you to ensure that you have the best function and strength.

Type of Metal and Appropriate Welding Process
- Steel — MIG, TIG, and Stick
- Stainless Steel — MIG, TIG, and Stick
- Aluminum Alloys — MIG and TIG
- Cast Iron — Stick
- Chromoly — TIG
- Copper — TIG
- Brass — TIG
Other Welders to Consider
Questions and Answers
Here are a few common questions associated with finding a new welder.
How much money should I spend on a welder?
The amount of money that you spend on a welder can vary drastically. Most people will tell you that the more expensive the welder, the better it is, but that is not always the case. You can find a basic welder for under $1000, but some of the more elite and higher quality welders that are meant for industry jobs will run you around $5000. So, really what you spend can be dependent upon how much money you have, the type of metal that you are working with and the job type.
If you choose a multi-functioning welder that will do all types of welding, you will be looking in the $1000-1500 price range for a basic, but a high-quality model. For a basic Stick or MIG welder, you can get always with spending less than $1000, but for the top of the line models, you will spend over $1500. For the TIG welding, you are looking at around $1200 to $3000. For Flux Capacitor welding you will be looking at even more expensive units ranging from $2000 to more than $5000.
What is the best welder for a beginner?
Being a beginner as a welder can be tough. You might not even know where to begin. However, the best thing to consider is looking at a welder that you can use for multiple different types of jobs. You should consider all of the work that you might want to do and buy the welder that is going to work with that. If you are trying to start your own business or learn for employment purposes, it is a great idea to take the time to enroll in a welding program. There are programs that are even offered on an internship basis if you are not able to afford to go to school. Just do not set yourself up for failure by profession to know more about welding than you actually do.
No matter how quick of a learner that you are, you are going to need to be honest about your skill level to ensure that you remain safe and do not put others at risk. Even if you are just going to be welding around your home for repairs or art, you might want to consider taking a short class, many communities have community-based classes so that you are always operating safely.
What is the best welder for home use?
Finding the best welder to use in the home really depends strongly on how you will be using the unit and what type of home you have. If you are going to be working in your garage or around your property on jobs, look into those jobs and find the welder that will suit all of your needs. Most homeowners find that they prefer a multi-purpose unit.
While the initial investment is a few hundred dollars more than the base models, there are many reasons that you can save money in the long run. One is that you will be able to do all of the jobs that come your way without having to purchase a second or third welder. However, if you know specific jobs that you will be doing and you will not be trying to do other things with your welder, then you can find the specific style of welder that will get your jobs done.
What are the best MIG welders?
Finding the best MIG welder can be a tough thing to do if you are not familiar with welders or the process of welding. The things that you should look for when trying to find the best MIG welders include knowing what type of welding you will be doing and the types of materials that you will be trying to weld. You will want to know the thickness of different projects so that you can choose the different MIG welder that will meet these needs. Reading reviews on MIG welders is a good place to start.
You will want to look for welders that have the features that matter to you. If you are looking to quickly weld, look for units that are able to hold automatic settings to ensure that your welder is always ready to go. For those who are prone to forgetting things, find a welder that has an auto-shutoff so that you do not cause any property damage by forgetting to turn off your welder. The best welders will be able to do your job, fit into your budget, and have the features that you are looking for.
Conclusion – Some Final Thoughts on How to Buy a Welder
When trying to find the best welder there are several considerations that need to be made. The first of these is the type of welder that you will need. The best way to be able to understand what you need is to look at the jobs that you will be doing and choose the welder that is made for those jobs.
There are some basic steps that you can take to ensure that you are going to have a welder that is not only going to work to meet your needs, but will also keep you happy for years to come. One thing is for certain, you will not want to purchase a new welder anytime in the near future because you forgot something that you wanted your welder to do. A welder is an investment and one that you should take the time to put thought and research into.
Safety should be the number one priority of anyone who is trying to start with welding. There are some safety considerations to make if you are going to start welding. The first thing that you should consider is what you are wearing. You do not want to have any skin that is exposed and you do not want to be wearing any synthetic materials that catch on fire quickly.
You will want a protective helmet, safety goggles that are specifically for welding, welding jacket, welding pants, boots or other heavy and protective footwear, gloves, and more. You do not want any skin to be exposed and you want to make sure that you are well protected from sparks and other dangers. While welding is a very dangerous thing to do, with these protections you are not going to have to worry about whether or not you will be safe and protected.